- Are you one of the people who’d kill for a curvature shader for Maya? Good news, you don’t have to!
Although polygons are no match for mathematically defined NURBS surfaces when it comes to serious design surfacing, in sketch modelling and concept development they’re killing it. To get the best speed to surface quality ratio when dealing with polygons I created this curvature shader for Maya. It is an ultimate tool for highlighting lumps and imperfections in your model as well as achieving better control over surface transitions and radii.
If you found this article while searching for “Maya curvature shader”, there’s quite a big chance you already found HW shader by Byron or Mentalray shader by Tom Cowland. Originally I though I’d do just fine with Byron’s shader, but I ended up with completely new plugin when trying to improve performance and display quality.
Computing vertex curvature
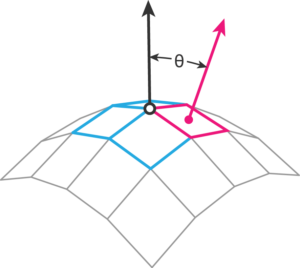
The both previously mentioned shaders are using very common method of calculating mesh curvature by measuring angle between face normal and vertex normal. The angle is then divided by perimeter of the face which results in higher curvature values in areas with increased density such as radii. Also thanks to this step the displayed curvature stays the same regardless of subdivision level of the mesh.

Since this method measures curvature per-vertex-per-face, with the same vertex the value differs for each adjacent face. This causes somewhat jagged appearance, which doesn’t improve even with increased subdivision levels. The easiest way to fix this problem is to average values of each vertex.
Here’s another problem. The angle between face normal and vertex normal ranges from 0° to 90° without any indication whether we’re dealing with a positive or a negative value. Luckily we can get this information by comparing orientation of angle plane normal and a reference plane normal.
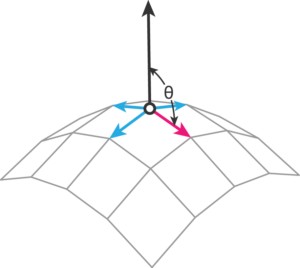
Curvature shader based on vertex-to-face normal angle has one major weakness which shows in areas where for example a tight positive radius crosses a larger negative radius. This issue was the main reason I came up with algorithm which uses adjacent edge instead of face normal.

This method beats the previous one in several ways. The angle between vertex normal and adjacent edge falls between 0° and 180°, where value < 90° indicates negative curvature while value > 90° is a sign of positive curvature. It also handles better the previously mentioned scenario of two radii with different size and orientation since the average curvature is weighted by individual edge lengths.

Preparation
Although MPxHwShaderNode::geometry() method provides points and vectors of the rendered mesh in function parameters, it doesn’t give us any information about connections between vertices, which is crucial for this plugin. Fortunately we can get DAG path of the rendered mesh with MPxHwShaderNode::currentPath() which we’re going to call inside MPxHwShaderNode::bind().
|
1 2 3 4 5 6 7 8 9 10 11 12 13 14 15 16 17 18 19 |
MStatus CurvatureShader::bind(const MDrawRequest& request, M3dView& view) { MStatus status(MStatus::kSuccess); m_path = currentPath(); if (!m_path.hasFn(MFn::kMesh)) return MStatus::kFailure; if (request.displayStyle() == M3dView::kPoints || request.displayStyle() == M3dView::kWireFrame) return MStatus::kFailure; MGLFunctionTable* gl = getGL(status); view.beginGL(); gl->glPushAttrib( GL_ALL_ATTRIB_BITS ); view.endGL(); return status; } |
Before calculating the surface curvature we have to generate a smooth mesh according to its smooth display options.
|
1 2 3 4 5 6 7 8 9 10 11 12 13 14 15 16 17 18 |
MStatus CurvatureShader::generateSmoothMesh(const MDagPath& path, MObject& meshData) { MStatus status(MStatus::kSuccess); MFnMesh meshFn(path, &status); MMeshSmoothOptions smoothOptions; status = meshFn.getSmoothMeshDisplayOptions(smoothOptions); MFnMeshData meshDataCreator; meshData = meshDataCreator.create(&status); MPlug displaySmooth = meshFn.findPlug("displaySmoothMesh", &status); (displaySmooth.asInt() > 0) ? meshFn.generateSmoothMesh(meshData, &smoothOptions, &status) : meshFn.copy(meshFn.object(), meshData, &status); return status; } |
Implementation
Once we have the smooth mesh, the easiest way to calculate curvature values is using MItMeshVertex to query vertex position, normal, and connected points to define adjacent edges.
|
1 2 3 4 5 6 7 8 9 10 11 12 13 14 15 16 17 18 |
// Query shader's attributes double scale = MPlug(thisMObject(), aScale).asDouble(); MRampAttribute map(thisMObject(), aColorMap, &status); // Generate and query the rendered mesh MObject meshData; status = generateSmoothMesh(m_path, meshData); MFnMesh meshFn(meshData, &status); MPointArray vtxPoints; status = meshFn.getPoints(vtxPoints, MSpace::kWorld); int numVtx = meshFn.numVertices(); MVectorArray vtxNormals; MColorArray vtxColors; vtxNormals.setLength(numVtx); vtxColors.setLength(numVtx); |
The rest is simple vector math. Using current vertex position and a connected point we construct a vector for each adjacent edge and calculate an angle to vertex normal. Since the angle is in 0-π range we need to offset it so that π/2 (zero curvature) becomes 0 (to achieve symmetric scaling for positive and negative values). After applying edge length and custom scale we calculate an average vertex curvature which needs to be offset back to get correct values from MRampAttribute.
|
1 2 3 4 5 6 7 8 9 10 11 12 13 14 15 16 17 18 19 20 21 22 23 24 25 26 |
MItMeshVertex vertexIt(meshData, &status); for (vertexIt.reset(); !vertexIt.isDone(); vertexIt.next()) { int i = vertexIt.index(&status); status = vertexIt.getNormal(vtxNormals[i], MSpace::kWorld); MIntArray connectedVertices; status = vertexIt.getConnectedVertices(connectedVertices); int numConnected = connectedVertices.length(); double vtxCurvature = 0.0; for (int e = 0; e<numConnected; e++) { MVector edge = (vtxPoints[connectedVertices[e]] - vtxPoints[i]); double angle = acos(vtxNormals[i].normal()*edge.normal()); double curvature = (angle / M_PI - 0.5) / edge.length() * scale; vtxCurvature += curvature; } vtxCurvature = vtxCurvature / numConnected + 0.5; map.getColorAtPosition(float(vtxCurvature), vtxColor[i], &status); } |
Rendering
With previous code we got colors, positions and normals of all mesh vertices which we can now use to draw triangulated mesh with OpenGL
|
1 2 3 4 5 6 7 8 9 10 11 12 13 14 15 16 17 18 19 20 21 22 |
MIntArray triCounts; MIntArray triIndices; status = meshFn.getTriangles(triCounts, triIndices); gl->glBegin(GL_TRIANGLES); for (unsigned i = 0; i < numVtx; i++) { int vtxId = triIndices[i]; double position[4]; double normal[3]; float color[3]; vtxPoints[vtxId].get(position); vtxNormals[vtxId].get(normal); vtxColors[vtxId].get(color); gl->glNormal3dv(normal); gl->glColor3fv(color); gl->glVertex3d(position[0], position[1], position[2]); } gl->glEnd(); |
Conclusion
This article covers the most important part of making a mesh curvature shader such as quering mesh properties, calculating vertex curvature and OpenGL rendering. Since this plugin is computing values for thousands of vertices I used some additional steps to improve performance, which you can check in source files.


14 Comments
Jason
03 Jan 2022 - 5:42 pmHi, I know this is a bunch of years later, but did this shader simply not exist before 2016?
Arnold now has an aiCurvature shader, and I’m wondering what the differences are between that and this, or if they just implemented the same principles as you have here?
Stepan Jirka
10 Jan 2022 - 8:27 amHi Jason,
There has been some curvature shaders for Maya before before but none for real-time work in the viewport. For my job I made one in ShaderFX which is calculated in the screen space. It’s little less accurate but the performance is way better and it’s more stable than this plugin. Maybe they did something similar.
Stepan
dario
08 Mar 2020 - 7:18 amHi Stepan. It possible to bake the shader to vertex color? IT would be great to have an option to do this.
Thanks
Stepan Jirka
08 Mar 2020 - 7:49 amHi Dario,
I’m sorry, this shader doesn’t have that option as the main point of it was a real-time display. It’s currently not being developed further. There are however scripts out there that do exactly what you’re looking for.
Stepan
Sergey
25 Nov 2019 - 9:12 pmHi! Thanks a lot for the shader! Could you make maya 2019 version? Would be very appreciated
Jose
06 Nov 2018 - 2:19 pmVery nice! Thank you!
Val
24 Apr 2018 - 6:55 amHi!
This seems to be great but I´m not able to load this in maya 2018.
I´ve copied the file and loaded the plugin for maya2018_x64 but I must be doing something wrong:
command (MEL): curvatureShader;
// Error: line 1: Cannot find procedure “curvatureShader”. //
Stepan Jirka
24 Apr 2018 - 7:48 amHi Val,
it is even easier than that. After you load the plug-in it becomes available in the Hypershade.
Don’t forget to set your rendering engine in Preferences->Display>Viewport2.0 to OpenGL. I’ve created a new, more stable curvature shader (because this one isn’t so stable) which works with DirectX 11 but I didn’t find time to prepare it for release yet.
Best regards
Stepan
hao
30 Mar 2018 - 2:55 amhi i test this shader in maya2018 the mesh wil be transparent in viewpoint . is that something wrong with me install?
Stepan Jirka
30 Mar 2018 - 6:37 amHi Hao,
Make sure you have textures enabled and the rendering engine for VP2.0 is set to OpenGL – Legacy. (Preferences->Display->Viewport2.0)
Best regards
Štěpán
Andrew Bradbury
24 Aug 2017 - 1:01 pmthanks so much saved alot of head scratching and will hopefully save me time exporting to another software for minimum radius checking.
Malom
28 Feb 2017 - 11:26 pmHow to install this tool?
Stepan Jirka
01 Mar 2017 - 7:24 pmHi Malom,
to be completely honest this version is more for developers as it is not quite complete. I’m planning a release of a proper version soon. Stay tuned.
dario
13 Feb 2017 - 2:22 pmgreat job